Pretty Patchwork 

Finding out you are going to be an auntie is as good a reason as any to start a new project. My brief was to make a playmat that would last and so I thought I would try my hand at patchwork and for my first foray into quilting I was pretty pleased with the results!

I chose the colours based on a gorgeous quilt I saw at crafty blossom. Not knowing the gender, I wanted a colour scheme that would suit a boy or a girl and I think these bright colours, interspersed with monochrome, look gorgeous together.

For the backing, I wanted a black and white print to provide a contrast and, although there were far too many lovely designs to choose from, I settled for these sweet clouds with a black and white binding to match.

I used thicker wadding than you would for a quilt to give it exrtra padding but thia made it quite bulky. I was looking for a solution to make it more transportable and gave up on the idea of making a carry case (too much work). My mum suggested finding a way to button it closed and it turned out adding a small loop of binding whilst seuribg the edging and abutton on the reverse did the trick nicely.

I did however have enough fabric left to whip up a little reversible drawstring bag and filled it with a nifty Groupon purchase of bright wooden blocks.

I was mightily pleased with this as a first attempt and am working up the energy for the next one!

Ghosts of Makings Past #6 – Card & Note Holder

I haven’t written one of these in a while but came across this picture recently of a project that I completed a couple of years ago and nostalgia prompted me to share it.

I do love it, but it’s also nice to see how my skills have improved since then.  Just last night I was catching up with the first episode of the latest series of the Great British Sewing Bee and realising how many new skills I’ve accumulated over the last year.

I’ve just completed my first year of blogging as it happens.  Must write about that and note a few new skills I want to try this year, as well as pushing the boat out a bit and perhaps trying to sell a few things.

I made this card holder using:

  • an artist canvas
  • scrap of material big enough to cover it
  • scraps of material for applique
  • some lace
  • bondaweb
  • embroidery thread
  • mini pegs
  • card
  • sewing machine
  • staple gun

I created a template from card and cut out my bird shapes from my scraps of fabric before backing them with bondaweb.  Then I fixed the background material in place temporarily with strong tape and positioned the birds and lace where I wanted them.  I removed the background material from the canvas, tacked the lace in place and ironed the birds to the backing.  At this point I also embroidered the writing.  Following this I attached the fabric with appliqued birds to the canvas, stretching it tight, folding it neatly behind the canvas and stapling it in place.  I adjusted the lace and then sewed it in place at intervals along each length, leaving plenty of space for card to slot in place. The pegs I made by fixing material to card with bondaweb and cutting it into heart shapes which I attached to the pegs with a glue gun.


IMAG0346

Pretty Peg Bag

This simple peg bag is made from fat quarters.  As ever, I am a firm believer that fabric choice is the making or breaking of a piece.

DSC_0058

I love the combination of ‘housey’ prints and the desings also happen to satisfy my long time love of turquoise and my current passion for mustardy hues.

DSC_0050

This was a good opportunity for brushing up on my applique skills.  It’s a lovely effect and reasonably simple to achieve.

DSC_0052

These little tags have become a standard addition to my sewing projects lately, a nice little touch and a pretty bit of detail.

DSC_0055

DSC_0056

And there you have it.  A simple but attractive peg bag that you can accomplish in a few short hours.

DSC_0049

Button Bauble Christmas Cards

Looking for an idea for a festive Christmas card that doesn’t take too long?

Look no further.

I stumbled across this nifty idea a few weeks ago and was able to knock up a few cards in no time!  Now if you’re sending 50 or so Christmas cards this year (you popular person, you) then this may not be for you, but I sent around 25 this year and this was a simple and easy to replicate model.

DSC_0003

I like the bright non-traditional colours.  Try pastel combinations, pinks and reds, purples, greens and blues, use sparkly or unusually shaped buttons.

DSC_0004

You need only some card blanks (or make your own from card), a silver pen (or other coloured pen of you choice),  some pretty buttons (I got mine from The Works, UK) and some glue (Use PVA or even better, a bostik-type glue for a really secure hold).

DSC_0005

These little cards can be easily customized by using different buttons.  I am always struggling for ideas for male cards but by picking out some nice blues and greens you can create, if not a particularly macho card, a boy-friendly version.

DSC_0006

DSC_0007

DSC_0008

Begin by drawing the vertical lines, with a small ‘bow’ and little triangle at the end where you will place your button.  Then glue on the buttons.  Leave card flat until completely dry to avoid the buttons slipping down the card (as you will see happened to a couple of mine, though pretty nonetheless)

DSC_0009

Apologies for photo quality, I didn’t have the best light and was a bit impatient to get them into their envelopes!

DSC_0002

Haven’t done your Christmas cards yet?  Well, hurry up!  Only 9 days to go till Christmas!!!!!!!! Woooooohooooo!

Still to come…

There is sooooo much crafting I would like to post on here right now!

However.

My most recent spurt of making is currently being fulled by the ever increasing imminence of Christmas and, as such, I fear it would be bad form to post details here and spoil the surprise for future gift ‘receivees’ (Not in the dictionary, but should be).

Christmas presents piled underneath a christmas tree.

I still intend to produce a few entries between now and then, Christmas cards, game recipes, a craft or two, however, in January this blog will see its first birthday and, to mark this momentous occasion (ok, a little bit of exaggeration there) you can expect to see a whole host of DIY projects, largely of the edible, sewable, giveable kind, that I have been preparing for Christmas.

So I suppose this post is just to say that making continues!  In what spare minutes I have, which is precious few of late.  Wishing everyone a happy December and stay tuned!

craft


Bringing stitching back.

A quick browse for textile crafts on pintrest and it’s clear that embroidery is back in.  I particularly love the trend of using an embroidery hoop to display work, just like a little sampler.  There are some beautiful designs out there and I love the way it combines the traditional with something of the modern hipster.

DSC_0003

I designed this little sampler for my grandparents’ Diamond wedding anniversary combining olive and pink shades.  It’s a great way of making a gift that is personal and I’m really pleased with how it turned out.

DSC_0008

After messing about with fonts and designs on a piece of paper until I was happy, I sketched the final design onto my calico with pencil before embroidering over it.  I added some felt to create little flowers and a few beads to add a bit of sparkle.

DSC_0012

To make your own, just get hold of some hoops from ebay, some thin wadding, calico, felt if required, and embroidery threads.

DSC_0010

I enjoy the simplicity of the embroidery.  It doesn’t take too long to make and requires only a few basic materials.  And there are loads of things you can do with them.  I plan to make a few more using various materials, techniques and designs so watch this space.


Little Girl’s Skirt Tutorial

Isn’t this skirt just so tweet?   I mean…, sweet?  And it’s really easy to make in just a couple of hours out of a half metre of cotton.

I have this crazy idea that if/when we are lucky enough to have kids I will sew loads of adorable clothes for them.  As it’s hard enough to find the time to sew now let alone with kids around, I’m not quite sure how realistic this is…  Still, our niece’s birthday felt like a good time to get practicing.

I made the skirt along similar lines to one I made for myself, High Waisted Skirt minus the lining and adding a button clasp and knot at the front.  I used interfacing for the front section of the waistband and threaded a little elastic through the back part hoping for a nice fit.

See Skirt tutorial below.

DSC_0002 DSC_0006 DSC_0008

“Bird Swing” fabric by Michael Miller

DSC_0009

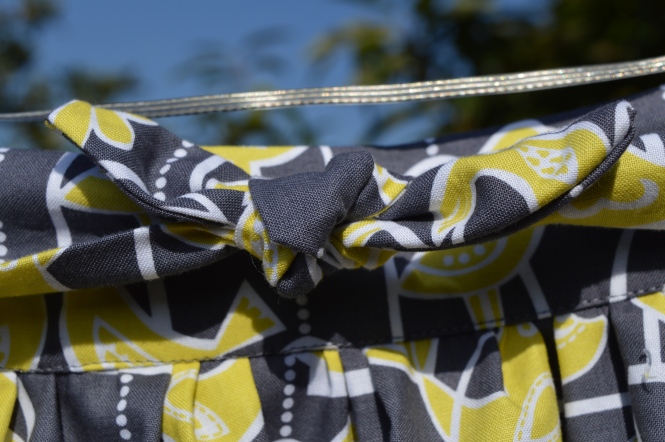
A little knot to add detail at the front. I had intended more fabric but managed to make it work.

DSC_0010 DSC_0012

The button fastening could have been neater but I’d never tried this before.DSC_0015

Back view, elasticated waistband.

DSC_0016

I apologise that this tutorial has no pictures but it’s simple enough to follow this step by step guide providing you have some basic machine sewing skills.  The skirt measurements are for a toddler age 2-3 but can easily be enlarged.

You will need:

  • 1/2 metre of cotton fabric
  • Matching Thread
  • 25cm Elastic, about 2cm wide
  • Button
  • Interfacing


1.  Cut out your pieces from the fabric as follows:

2x rectangle 72cm x 25cm (skirt)

2x rectangle 37cm x 12cm (waistband)

2x rectangle 37cm x 10cm (bow, make shorter if only a knot is desired)

1x rectangle 3.5cm x 37cm (button fastening)

The diagram below shows how these pieces can be cut from your half metre fabric.  Each piece (apart from fastening) allows for a 1cm seam. It’s a squeeze but very minimal wastage.

tutorial 1And, don’t forget –

1x rectangle of interfacing 37cm x 12cm or just a little smaller (front waistband)

2. Pin together skirt pieces, right sides facing.  Sew along the edges to form seams, leaving 5cm open at the top of one side for the fastening.  Press seams open, including section left open.

3.  Hem the section that has been left open.  Sewing on the right side of the fabric, sew from the top edge of the skirt down one side of the open section, across the seam (sew back and forth for extra strength here) and back up the other side to the top edge of the skirt.  This is very like sewing a zip, except without the zip!

4. Hem skirt. (Alternatively this can be done last).

5.  Gather the top edge of the skirt using running stitch.

6. Take one of your bow rectangles.  Fold in half, right sides facing and pin.  Sew along the pinned edge leaving a 1cm seam.  Leave one end open and sew the other closed at a 45 degree angle.  Turn right way out and press.  Repeat with second bow piece.

IMPORTANT: If using patterned fabric, when you come to tie your bow together you want both pieces to show the pattern the same way up with the two points of the fabric sloping down and away from each other.  (See image below) When sewing second bow piece, make sure that you sew the correct end shut as this will determine whether it looks right or not.

tutorial 2

7. Take one of your waistband rectangles and press interfacing to the wrong side of the fabric.  This is now the front section which we will label A.

8. Fold both waistband rectangles in half lengthways and press.

9. Take the second waistband rectangle (without interfacing). This is the back waistband which we will call B.  Lay it on your work surface reverse side up. Tack one end of your elastic in place on the LEFT side (opposite to where you intend to fit the fastening).  Tack it to the reverse of the fabric within 1 cm of the edge and ensure that the elastic sits just below the crease of the fabric where you have just pressed it.

10. Now take waistband A.  Lay it down on your work surface, right side up.  Take one bow piece and tack it in place on the LEFT side of the waistband (opposite to where you intend to fit the fastening).  Tack it to the right side of the fabric within 1 cm of the edge and ensure that it sits just below the crease of the fabric where you have just pressed it.

11. Pin waistband sides together, right sides facing, matching the creases in both sections.  Sew along the edge where you have just attached the elastic and bow piece to form a seam.  Press seam open.  (You may wish to secure the elastic in place by sewing it firmly to the seam with a zig zag stitch)

12.  Take your joined waistband and press a 1cm seam along the top and bottom edge.

13. Make your button fastening by taking the smallest rectangle and folding it in half lengthways, right sides facing.  Sew along the long edge leaving a 5mm seam. Trim the excess if necessary and turn inside out to form a long thin strip.  Press flat.  Fold strip in half and open again.  Fold both ends downwards towards the middle so that they meet and lie parallel to each other leaving two 45 degree folds forming a point at the half way mark.  (See below)  Sew a straight line as marked on the diagram in red.

tutorial 3

14. Open your waistband, right side up.  Tack the second bow piece to the open end of waistband A in the same way as before, tacking on the right side of the fabric.  Turn waistband over, to the reverse side. Take the fastening piece you have just made and tack it to the lower half of the open end of waistband B leaving an opening large enough for your button (but not so large it will slip out). You will need to trim away the excess.

15. With the waistband still reverse side up and open, take the gathered skirt.  You will need to attempt this stage working on one side at a time, working from left to right.  Pin the edge of the skirt you left open to the open end of waistband A making sure to match up the middle seams of skirt and waistband pieces.  The skirt should overlap the waistband by about 2cm. Pin one side of the skirt to waistband A, ensuring the gathers are evenly spaced and securing the pins high up to avoid getting caught during sewing.  Once you have done one side, you should then be able to see how to move the fabric around so that you can do the same with the other side. Again, match the open end first the pin the gathers in place.

IMPORTANT: Skirt should be pinned right side up onto the reverse side of the waistband ready for when the waistband is folded down over the top edge of the skirt.

16.  With the skirt inside out, sew one long seam along the bottom of the waistband on the right side of the fabric.  This will be the inside of the waistband.

17.  Remove your pins and fold down the waistband, covering the rough top edge of gathered skirt.  Pin in place.  Turn your skirt right way out.  Sew another long neat line of stitching along all the long edge of the waistband securing the skirt in place.  You are nearly finished!

18. Hook out the elastic, this isn’t hard to do, and pull it so that it reaches the open edge of the waistband. Tack it securely in place before sewing the end of the waistband shut.  Now sew the other end of the waistband shut and remove any visible tacking.

19.  Sew on a button to finish your fastening. It should be big enough, and placed in the right place to hold the fastening shut.


Colourful Coasters!

Hmmm, so what to do with a few spare coasters?  Time for an upcycle?  I think so!  I used materials I had knocking about (including washi tape from our wedding stationary) so spent a total nothing on this project and it only took an evening.  And now I have six very cute coasters ready which should look lovely in our new home.

This VERY simple diy tutorial below will tell you all about it:

IMG_3107

You will need:

  • Coasters – use old coaster in need of a makeover, buy from charity shop, or find cheaply online.
  • Paint – neutral colour, I used a left over tester pot of emulsion
  • Washi tape – At least two different co-ordinating patterns.
  • Craft knife – or sharp scissors
  • Gel medium – such as Mod Podge or Liquitex (Alternatively use PVA!)
  1. Paint your coasters on both sides leaving to dry between coats.
  2. Once fully dry, create your desired pattern on each coaster with washi tape.  Leave the edges of the tape hanging off the edge of the coaster.
  3. Turn your coaster over and place washi side down on a craft cutting board.  Use your craft knife to cut around the coaster, getting rid of excess tape. Smooth down the edges where the tape has been trimmed.
  4. Now cover the washi taped side in a thin, even layer of gel medium.  Leave to dry.  Turn over and repeat on plain side.
  5. Leave to dry completely, and, voila!

IMG_3104

I love these, they would make a great gift, tied with pretty ribbon.  Try out different designs and styles, why not use glitter, sequins, scrap booking paper, wallpaper scraps, old theatre tickets or your favourite photos.

Pretty peplum

This is the first item of clothing I have made entirely pattern or tutorial free.  Needless to say, I am just a little proud of it.  It represents a big step on my clothes making adventure and I was mightily surprised to discover that I can do it!

Inspired by The Great British Sewing Bee‘s Chinello, I really wanted to make something with a peplum, having discovered just how easy it is.  Peplums are just so flippin fabulous – so flattering (especially if you happen to be the curvy kind like me : / ) and uber glamorous.  And there’s something of the African about them that just reminds me of being in Uganda somehow.

My peplum halterneck is the perfect summer and it it is, from design to finished article.  It looks great with a pair of high waisted trousers.  It even looks fantastic with my little diy stretch jersey mini skirt….(yes, you did recognize the material) although it’s a brave wear altogether!!

IMG_2908  IMG_2914

I’m not joking when I say easy.  A peplum is essentially a simple circle of fabric with hole in the middle (imagine viewing a donut from above!) When this wide circular band is fitted to the bottom of a top or the top of a skirt, it falls in pretty waves that perfectly flatter the hips and waist.  Now of course there are countless ways of adapting this simple design element.  Here are a few tutorials:

Draft a peplum

Simple Peplum

5b4c61712aa8d3b7b8369da53b6e2a8f

Peplum shirt

532dc6de287411050288b01a092feb32

Peplum Skirt

323b1ec89f016e82be89baf255dd4074

I was a little uncertain as to whether the pepulm would suit me, that was until I tried it on.  And, my goodness, if I could, I would attach a peplum to my entire wardrobe.